Modern leak detection works by picking up on something a hidden leak changes in its surroundings: the sound escaping water makes, a temperature difference in the wall surface, a shift in pressure along the pipe, or the presence of a tracer gas that escapes at the exact point where the pipe has failed. Reading that change allows an engineer to pinpoint the leak within inches rather than opening an entire wall or floor to search for it.
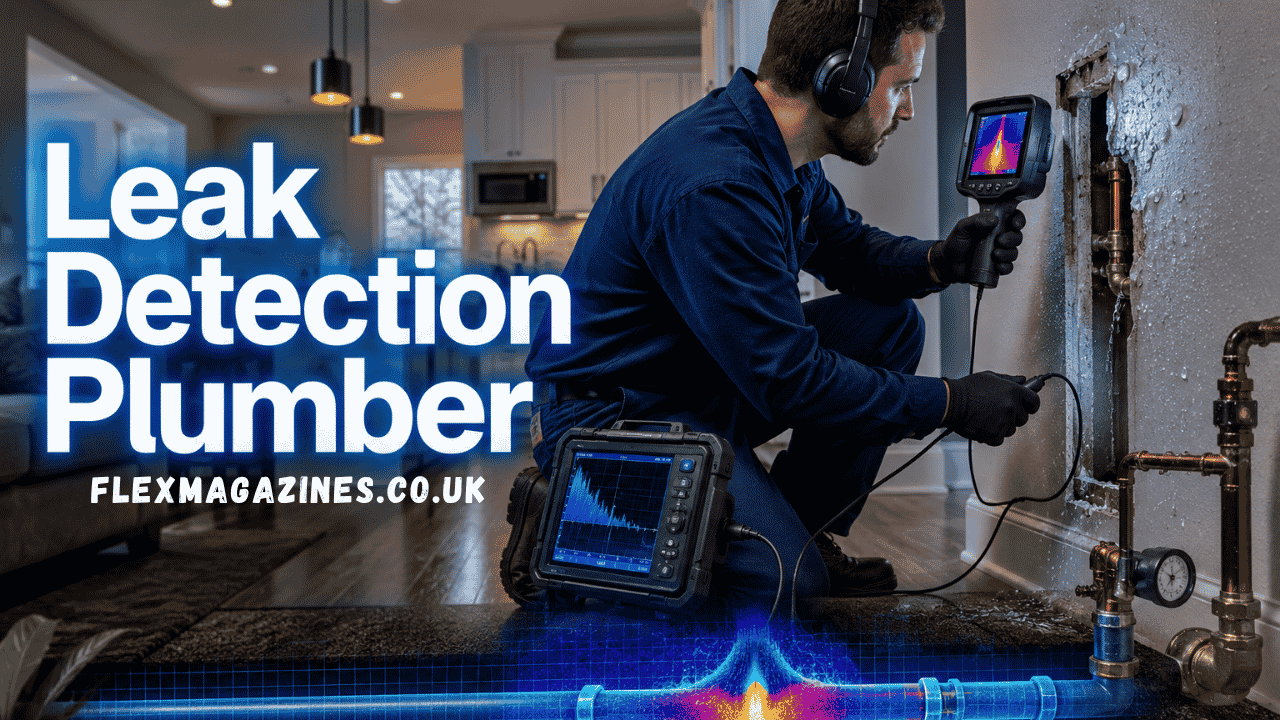
Finding a leak used to mean lifting floors or knocking through a wall just to see where the water was actually coming from. That’s rarely necessary now. Plumbers carry water leak detection equipment that pinpoints a leak’s exact location using sound, heat, and pressure instead of guesswork, often without removing a single floorboard. This guide covers how the main types of equipment work and why they save both money and mess compared with the old trial and error approach.
The Old Approach to Finding Hidden Leaks
Before specialist detection equipment became standard practice, finding a hidden leak meant following the damp patch and hoping it pointed roughly toward the source. Engineers would lift floorboards section by section or chase a damp wall along its full length, often opening up far more of the building than the actual fault required. A leak behind a tiled bathroom wall might mean removing an entire section of tiles and boarding before the plumber could even see the pipe in question.
The repair itself might take an hour, but the destruction needed to reach it could take a full day and leave a homeowner with substantial reinstatement work to arrange separately. The old method was not without logic, since water does leave a trail, but it was expensive, disruptive, and heavily dependent on the engineer’s experience in reading how water moves through a building.
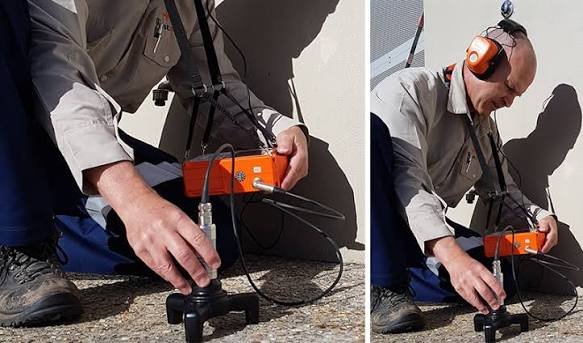
Acoustic Detection: Reading the Sound of Escaping Water
Water escaping under mains pressure does not leak quietly. It creates a faint but consistent hissing or rushing noise that travels along the pipe itself, conducting through the material even when the pipe is buried under several inches of concrete or plaster. That sound is too faint for the human ear to pick up reliably in a noisy environment, but acoustic leak detection equipment is built specifically to isolate it.
The engineer places a sensitive ground microphone or contact sensor at multiple points along the suspected pipe run and listens for where the noise reaches its highest intensity. That peak almost always marks the spot directly above or beside the leak. In skilled hands, acoustic detection can narrow a leak to within a few inches, which means the access point opened for repair can be kept to an absolute minimum. Background noise from traffic, appliances, or nearby pipework is the main practical limitation, and most engineers work early in the day or temporarily isolate appliances before relying on sound alone for their final reading.
Thermal Imaging: Seeing Temperature Changes in Walls and Floors
Water changes the temperature of whatever material it is sitting in, even slightly, and that temperature difference shows up on a thermal camera long before any visible dampness appears on the surface. Thermal imaging leak detection works by scanning a wall or floor with an infrared camera that translates temperature variations into a colour-coded image. A patch that reads cooler or warmer than everything surrounding it often corresponds exactly to where a pipe is leaking underneath.
Thermal imaging is particularly effective for underfloor heating systems, where warm water leaking from a buried pipe creates a clearly visible warm patch on the floor surface. For cold water pipes, the effect is reversed, and the leak point shows as a cool area against the ambient temperature of the surrounding material. The limitation of thermal imaging used in isolation is that temperature differences are not exclusively caused by leaks. Old pipework, insulation gaps, or even an area of wall that receives direct sunlight can produce a similar pattern on the camera. Most engineers use thermal imaging to identify a candidate area and then confirm the finding with a second method before opening anything.
Tracer Gas, Moisture Meters, and Pressure Testing
Tracer gas detection is typically the most precise method available for leaks buried under solid floors where sound and thermal methods are harder to apply reliably. The process involves emptying the pipe of water, pumping it full of a gas mixture, usually nitrogen combined with a small percentage of hydrogen, and then using a handheld sniffer probe to scan the floor surface. Hydrogen is the lightest element and travels upward through even dense materials, so it escapes at the surface directly above the leak point.
When the sniffer detects a concentration of the gas, the engineer has found the leak within a very small margin. Because the gas is inert and used in a low concentration, there is no safety risk to the property or its occupants during the process.
Moisture meters serve a different but equally valuable role. Rather than finding a leak from scratch, they measure exactly how far dampness has spread through a wall, floor, or ceiling material. This is useful for confirming a suspected area, for assessing the extent of water damage after a leak is found, and for tracking drying progress once a repair has been made.
A borescope, which is a thin camera on a flexible cable, allows an engineer to look inside a wall cavity or under flooring through a small drilled hole rather than removing a larger section of material. Pressure testing rounds out the toolkit by isolating a section of pipework and monitoring how quickly the pressure drops. A pressure drop confirms there is a leak in that section, narrowing the search area before any of the other methods are deployed to find the exact point.
Comparison of the Main Leak Detection Methods
Each method works by detecting something different, which is why engineers typically combine two of them rather than relying on a single technique. The table below summarises how each one works and where it performs best.
| Method | How It Works | Best Suited For |
| Acoustic detection | Listens for the sound of water escaping under pressure | Pressurised pipework still accessible by sound |
| Thermal imaging | Spots temperature differences caused by hidden moisture | Underfloor heating, large open walls, quick area narrowing |
| Tracer gas | Detects gas escaping at the exact leak point | Pipework buried under solid concrete floors |
| Moisture meters | Measures how far dampness has spread through a material | Confirming a suspected area, checking drying progress |
| Pressure testing | Monitors pressure drop in an isolated pipe section | Confirming a leak exists before tracing its exact spot |
Why Detection Equipment Protects the Property
The practical benefit of modern leak detection equipment is straightforward: when a plumber knows where the leak is before opening anything, the access point can be sized to match the repair rather than the search. A pipe joint behind a tiled wall might need a single tile removed and a small section of boarding cut back, rather than a full wall strip.
A leak under a concrete floor can be accessed through a precisely placed cut rather than a broad section lift. That difference in scale has a direct impact on the cost of making good afterward and the disruption to the household during the process.
Smaller access points also mean the repair itself moves faster. There is less debris to clear, less reinstatement to organise, and less time before the bathroom, kitchen, or room in question is back in use. For leaks in period properties or homes with high-quality finishes, targeted access also reduces the risk of damaging materials that would be difficult or costly to match and replace.
When a Section Still Needs to Be Opened
Detection equipment locates the leak; it does not carry out the repair. Once the position has been confirmed, reaching the pipe still requires opening a section of wall, floor, or ceiling. The difference is that this opening is now deliberate and precise rather than exploratory. An engineer who has pinpointed a leak to within a few inches will cut or remove only what is directly necessary, fill the repair, and leave a fraction of the reinstatement work that an unguided approach would have created. In a small number of cases, usually where pipework runs through an unusually complex route or where a building has been significantly altered over time, the detection process will narrow the leak to an area rather than a single point. In those situations, a small exploratory opening in the most likely spot resolves the last uncertainty before the repair proceeds.
The Sequence of a Typical Leak Detection Survey
Most detection visits follow a consistent order regardless of which equipment ends up identifying the leak. The engineer begins by asking when the damp first appeared, where it is most pronounced, and whether any recent work has been done to the pipework. That conversation narrows down the likely pipe run before any equipment is deployed, which saves time and directs the survey toward the most probable area.
Non-invasive methods come first. Acoustic listening or thermal imaging can cover a large area quickly and give an initial steer without any preparation of the pipe. A second method, most commonly tracer gas or a moisture meter, is used to confirm the first reading before the wall or floor is touched. Only once the location is agreed does the engineer mark and open the smallest access point necessary to reach the pipe. That sequence, gathering information first, confirm before opening, minimises both the uncertainty in the result and the disruption to the property.
Getting a Leak Found With Minimum Disruption
A leak that is properly located before anything is opened almost always costs less to resolve than one found by progressive demolition. The detection stage is not an extra step; it is what makes the repair targeted, proportionate, and predictable. Homeowners who understand what the equipment does and why it is used are better placed to ask the right questions before a survey begins and to understand what the engineer finds during it.
0800 Homefix sends plumbers equipped with the full range of detection equipment, covering acoustic, thermal, tracer gas, and moisture methods across London. Locating the source rarely means more than a small, targeted opening rather than a guessing game across an entire room.
Frequently Asked Questions
1. How accurate is modern leak detection equipment?
Most methods can narrow a leak down to within a few inches when conditions are favourable. Accuracy can be affected by background noise, the presence of multiple nearby pipes, or heavily corroded older pipework that conducts sound inconsistently. Using two methods in combination significantly improves the reliability of the final result.
2. Can leak detection find a leak under a concrete slab?
Yes. Tracer gas is the preferred method for leaks buried under solid floors, as the hydrogen component travels upward through the concrete and registers at the surface directly above the fault. Acoustic detection can also be used on solid floors, though tracer gas tends to give a more precise result when the floor material is dense.
3. How well does thermal imaging work on older or long-standing leaks?
An older leak that has been present for some time may have already spread evenly through the surrounding material or partially dried, reducing the temperature contrast the camera needs to pick up. Recent or active leaks show up more distinctly on thermal imaging. Where an older leak is suspected, tracer gas or moisture mapping tends to be more reliable.
4. How long does a professional leak detection survey take?
Most surveys take between 30 minutes and two hours, depending on the size of the property, how many areas need checking, and which detection methods are needed. A straightforward leak in an accessible location can be found and confirmed in under an hour. A concealed leak in a large property requiring multiple methods may take longer.
5. Does leak detection equipment work on plastic pipes as well as copper?
Yes, though acoustic detection is slightly less effective on plastic pipework because plastic does not transmit sound as efficiently as copper. Thermal imaging and tracer gas both perform consistently regardless of pipe material, so plastic pipework does not significantly limit what detection methods are available.
6. Can a leak be found without turning off the water supply?
Often yes. Thermal imaging and moisture meters work without any change to the water supply. Acoustic detection actually performs better with the water under live pressure, since the escaping water produces a clearer sound signal. Tracer gas does require the pipe section to be drained before the gas is introduced.
7. Is leak detection covered by home insurance?
Many home insurance policies include a trace and access section that covers the cost of finding a leak, including the detective work and any opening required to reach it. Coverage varies significantly between policies, so it is worth checking the specific wording or speaking with the insurer before booking a survey.